
[00:12] In this video, we will talk about the advanced configuration for Odoo. So, this is very technical. This should be done by someone who has an IT background or a little bit techy and we usually do this for ‘yong mga clients namin na mag go-go live na it has more than maybe 15, 20 users. Para ma optimize ‘yung pag run ng Odoo. Okay, and I will show you how it’s done in the system.

[00:55] So, First of all, ang requirements natin, you need to have a subdomain and, so ‘yong subdomain is your .com, .ph, So for this, we are going to use a subdomain just to test iyong ginawa nati’ng configuration. You also need, we will do a little bit of basic math para Komputin natin kung ano ‘yong requirements na kailangan ng Odoo to run properly, and NGINX, we need to install yong NGINX as well.
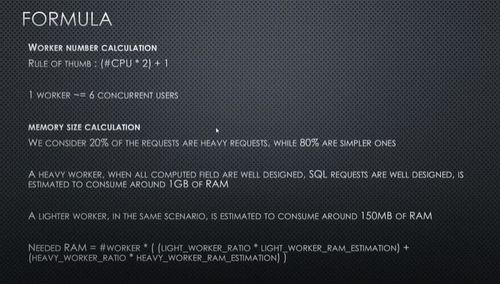
[01:46] So ang formula ng Odoo to compute for this, ang rule of thumb natin for every virtual CPU, mu-multiply natin sa dalawa and add one, and that would be the number of the, ‘yong tinatawag natin na workers, okay, or threads sa ibang environment. So in Odoo, we call those workers. And ang isang worker can handle six concurrent users okay, not six users, but six concurrent users. By concurrent that means sabay-sabay nag access ng Odoo ‘yong anim na users na ‘yon. So again, one worker kayang mag handle ng six concurrent users. Okay, pag dating naman sa Ram computation natin consider na about 20% sa deployment namin, about 20% ng mga requests ng users are very heavy, very sensitive, ‘yong mga queries namin kailangan talaga ng Ram but most of the users about 8 out of 10 or 80% nang users or yung mga request na ginagawa ng users are very simple lang, retrieve lang ng record, pag a-add lang ng redord. So, pag nag calculate tayo ng requirement ng Odoo when it comes to Ram or yung memory, about 1 gig ang na co-consume kapag heavy request, about 150MB kapag light na request lang. Ang needed Ram natin, I have displayed ‘yong formula. So, it's the number of workers multiplied by ‘yong lightworkers natin and ‘yong estimation natin plus ‘yong worker ratio, ‘yong for heavy worker ratio multiplied by ‘yong estimate natin for heavy worker Ram, Okay.

[04:11] So, to give you an example ito ‘yong gagawin natin. So let’s say your company has 50 concurrent users okay, so maybe around 80 or 90 employees pero ang nag sasabay-sabay talagang nag a-access ay 50 users. Day in, day out pag dating ng office hours 50 users ang gumagamit ng system. Technically ang kailangan natin na workers would be 8, so 8 workers ang kailangan natin para mag perform ng maayos yung system, natin hindi mabitin ‘yung server natin. So, ang a-add tayo ng 1 worker, this is for the kron or ‘yung mga automatic na task na ginagawa ng Odoo in the background like sending emails and stuff like that. So, having computed this ang server natin na available has 4 cores or 4 CPU and mayroon tayo’ng 16 Gig na ram. So again ang number of workers natin ang maximum would be 9\. We will use 8 workers for Odoo and 1 worker for kron. Pag dating natin sa ram, so we have ‘yong 9 workers, 80% ng request at 150 Mb and 20% ng request at 1 gig. Roughly we’re looking at about 3 gigs na ram for Odoo. And this is good, pasok na pasok du’n sa alotment natin na 16 gig na ram, assuming na ‘yong server ang naka install lang duon is Odoo. Of course you have to factor in ‘yong mga ibang software na anduon but in our case ang nilalagay lang talaga namin sa server is just Odoo plus the database.

[06:25] Okay, so again as you saw, this is not for everyone. So kung ang company niyo ay walang IT you might as well outsourced this or kung mayroon man IT pero walang expertise sa Odoo, i-outsorce niyo na ito, and if you’re making more than 50 Million in gross sales annually, outsource this kasi this is going to be very critical you need someone who’s constantly monitoring the performance of the servers hindi siya ganoon kadali and kung, lahat naman natututunan but I don’t think ‘yong company data nyo i-entrust niyo sa amateurs. So, kung pasok kayo dito sa mga classification na ‘to, really think about how you’re going to deal with this before you move forward. 
[07:29] Okay, so you can go to www.reinonodoo.com kung kailangan niyo nang mag i-install and configure ni’to or kung i-outsource niyo na yung buong server and ‘yong maintenance you can also go to www.reinonodoo.com to check the alternatives.
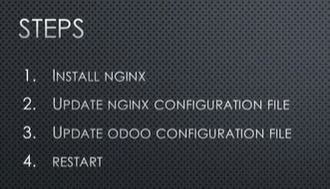
[07:46] Okay, so ang gagawin natin ngayon would be i-install natin yung NGINX.Okay, and i-update natin 'yong configuration file ng NGINX. And then i-update natin 'yong odoo configuration file, based doon sa math na ginawa natin kanina. And ire-restart natin lahat. Okay,
[08:14] So its very easy to install NGINX so I’ll just do a quick search. Maraming reference yan.

[08:35] Okay, so this one. Copy lang natin so we need to install NGINX like so.

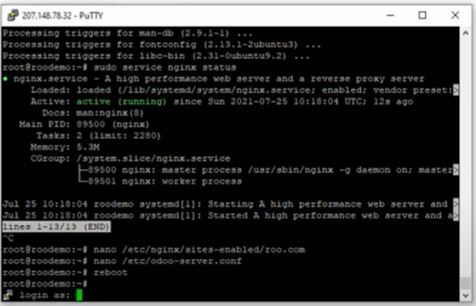
[08:53] Okay and to check, so naka install na yung NGINX natin. 
[09:10] So if we go to our server, you’ll remember in our earlier video gumawa tayo ng server pag nilagyan natin port :8069 nag lo-load yung Odoo So ngayon hindi nilagyan ng port 8069 so alam natin gumagana yung NGINX natin. So ang kailangan natin sa next step natin is we need to configure 'yong configuration file ng NGINX. Okay so may pirepare ako dito na text document so gagawa tayo ng NGINX configuration file so, ang command natin its like this.

[10:04] Okay. And ang next natin, i have to explain this a little bit.

[10:19] Okay, so this means, basically that uh kapag may nag request sa server natin at port 8069 ifo-forward niya sa odoo and kapag 'yong request is going to port 8072 which is odoo’s chat then ifo-forward niya sa odoo’s chat. And then sa server we’re listening at port 80 so any request coming from the subdomain www.reinonodoo.com papakinggan niya. So, everything else is straightforward. Ano 'yong mga proxy headers na kailangan natin i-set. Ano 'yong location then of course 'yong compression natin. So you can pause this video if you wanna type this in. Okay, but it’s pretty straightforward if you are familiar with NGINX.
[11:31] So I’m going to copy this and paste it sa configuration file natin.

[11:51] Okay, so ang next na gagawin natin is we will need to update 'yong Odoo configuration file. So ang command natin is nano /etc/odoo-server.conf Okay, so ang mga ilalagay natin proxy_mode =True. That means gagamitin na natin 'yong NGINX natin, okay.

[12:33] And then 'yong mga limits natin. So 'yong limits natin, 'yong mga na-compute natin. So ito 'yong na-compute based doon sa computation natin. So we will use this. So, limit_memory_hard, limit_memory_soft, time ng CPU, and limit, real limit bago talaga i-terminate. Okay, so you can read about this configuration if you go to... this is very well documented. So just google for Odoo-bin CLI and everything is documented here. You can read more about this, kung ano 'yung nilalagay natin na mga commands.
[13:33] So, going back. Copy and paste nalang natin iyan.
[13:44] And, we’ll save it. Okay, so at this point kailangan nalang natin i-point 'yong subdomain natin going dun sa IP address natin and that’s it, it should work. So let’s uh go ahead and try that now
[14:07] Okay, to test uh first of all we need to restart the server. Okay, so we’ll we’ll uh restart the server, let's just make sure na gumagana sa siya
[14:34]So I’m just making sure na gumagana na yung server natin before we actually test. Okay, so I’m just trying to reconnect 'yong putty ko pag nag connect na siya we know that the server is already running.
[14:53] Okay so ayan na, nag connect na siya. So we already know that it’s already running. Okay, and ang kailangan nalang natin is to test. So 'yong subdomain na sinetup ko is a demo.rainonodoo.com and we’ll go to this. Okay, so nag forward na siya doon sa Odoo na Odoo instance na ginawa natin sa unang video. Okay so, I will log in...

[15:48] Okay, alright. Okay, so I almost forgot the password okay. So we’re able to log in. so let's just create a new record to make sure we are using the same instance. So just select any product here and...

[16:29] okay, that's it. Okay, so I should be able to log in as well using the IP address, okay. So ito 'yong IP address natin and it should show the same records.

[16:51] So ito, ito 'yong ginawa natin just now. So 'yong configuration natin its automatically forwarding from this domain, the demo.reinonodoo.com going to this. Okay so what you did not see is the configuration in the control in your domain control panel its different for every um for every uh type of control panel. Kung san niyo binili, either godaddy or wherever. Also, what you did not see is 'yong each 'yong ssl configuration but depending sa domain control panel niyo or kung naka cdn kayo then you can also use the HTTPS for that. So, like so, gumagana 'rin 'yong HTTPS for my subdomain even though I haven't configured anything additional for that. Just because 'yong sa domain. So, again we installed 'yong NGINX, updated 'yong NGINX configuration file, we’ve updated 'yong Odoo configuration file, and then we restarted the server.
[18:33] And that’s it, you should be able to configure 'yong advanced na configuration ng Odoo. and make sure you read up on the documentation if you are learning this, but this should be a good start for you.
